There's something satisfying about running a language model on your own hardware. No API keys, no subscriptions, no data leaving your machine. Just you and the model.
If you have an AMD GPU and a Windows machine, you're in luck. With llama.cpp and ROCm, you can run models locally with performance that rivals — and sometimes beats — tools like LM Studio. The catch? Building llama.cpp from source on Windows with ROCm support is notoriously painful. But luckily, AMD provides pre-built binaries that skip all that hassle.
This guide walks you through two things:
- Part 1: Installing the C++ build dependencies you'll need via Visual Studio
- Part 2: Downloading and running llama.cpp with a real model on your AMD GPU
Part 1: Setting Up C++ Dependencies with Visual Studio
Before we touch llama.cpp, we need to make sure your system has the C++ build tools installed. Even though we're using pre-built binaries (not compiling from source), some dependencies and runtime libraries still expect these to be present.
Step 1: Open Visual Studio Installer
If you don't have it yet, download Visual Studio Community from visualstudio.microsoft.com. If it's already installed, open the Visual Studio Installer from your Start Menu.
You'll land on a screen like this — click the Modify button (or Install if it's a fresh install):
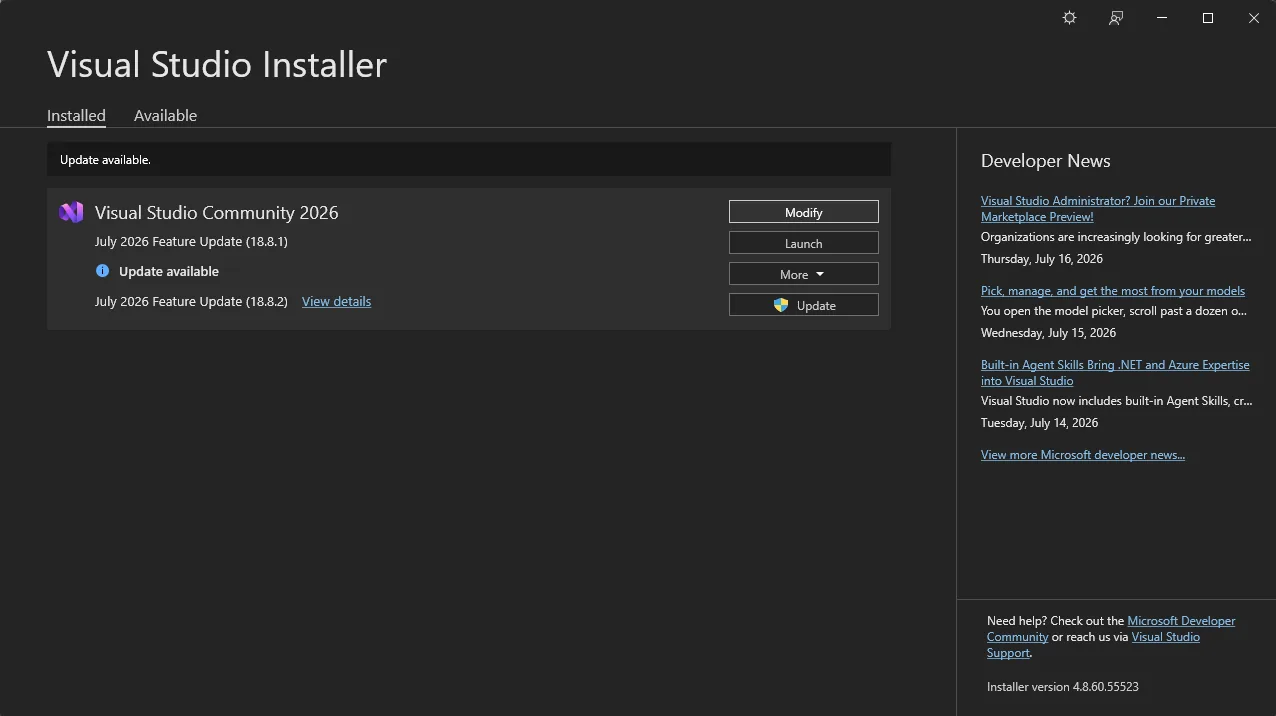 Visual Studio Installer — click Modify to add workloads
Step 2: Select the Right Workloads
In the Workloads tab, check the following:
- .NET desktop development — provides core .NET runtime tools and C# support
- Desktop development with C++ — this is the important one. It installs the MSVC compiler, Windows SDK, and C++ standard libraries that llama.cpp binaries depend on at runtime
On the right panel, make sure the optional components are checked — especially anything related to C++ build tools and the latest Windows SDK.
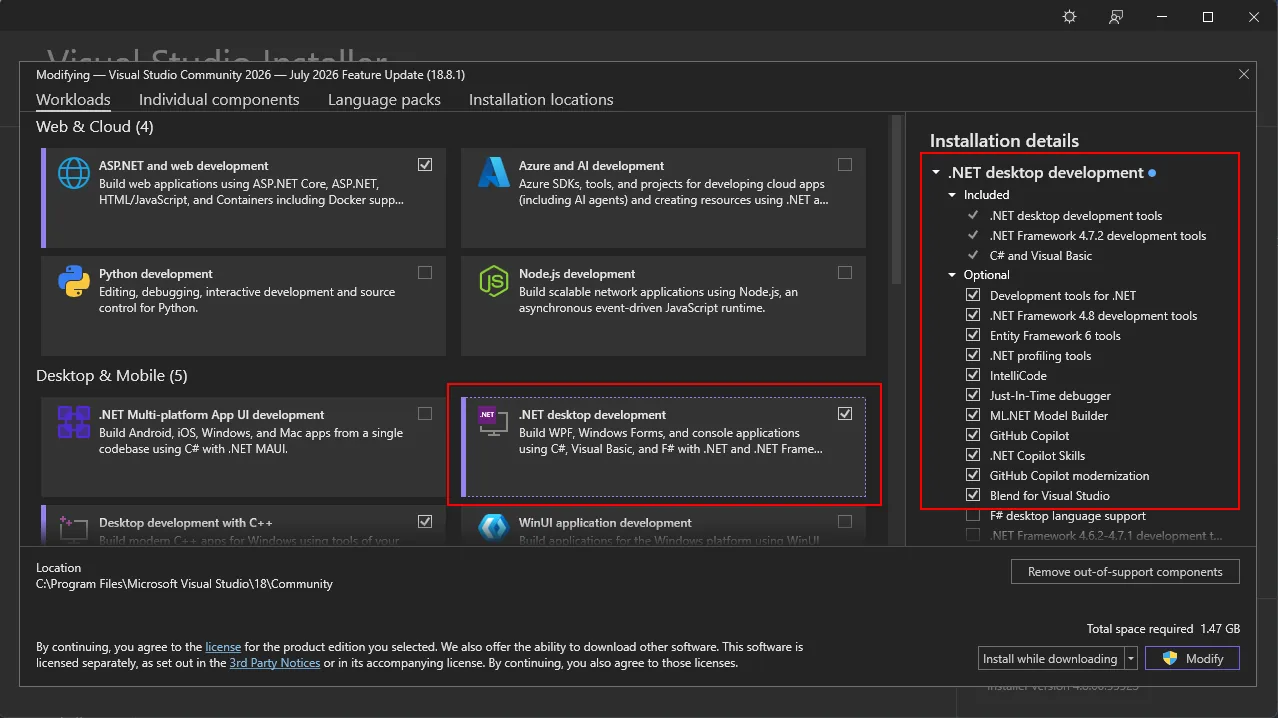 Select .NET desktop development and Desktop development with C++
Step 3: Install / Modify
Click Install (or Modify) in the bottom right corner. The installer will download and set up everything. It takes a few minutes depending on your connection.
Once it's done, you're ready for the fun part.
Part 2: Running Local Models with llama.cpp
llama.cpp is a lightweight C++ implementation of Meta's LLaMA architecture. It runs models in the GGUF format directly on your hardware. Combined with ROCm (AMD's GPU compute platform), it can offload model layers to your AMD GPU for serious speed.
Why not use something like LM Studio? LM Studio is great for getting started, but it abstracts away control. With llama.cpp, you get:
- Full control over context length, GPU layers, and sampling parameters
- An OpenAI-compatible API server you can plug into any tool
- Benchmarking tools to actually measure your hardware's performance
- No Electron overhead — just a single executable
The downside? Building from source on Windows with ROCm is a nightmare. But AMD publishes pre-built binaries that just work.
Step 1: Download the Pre-built Binaries
AMD hosts validated builds at repo.radeon.com/rocm/llama.cpp/windows. Grab the latest package:
curl.exe -o llama-bin-windows.zip "https://repo.radeon.com/rocm/llama.cpp/windows/rocm-rel-7.2.1/llama-b8407-windows-rocm-7.2.1-gfx110X-gfx115X-gfx120X-x64.zip"Step 2: Extract the Archive
Unzip it into a clean directory:
Expand-Archive -Path "llama-bin-windows.zip" -DestinationPath ".\llama_cpp_binaries"Then navigate into the inner folder:
cd ./llama_cpp_binaries/<specific_folder_name>Step 3: Download a Model
The binaries are the engine — you still need a model file (in GGUF format) to actually run something. For testing, we'll grab GPT-OSS-20B:
curl.exe -L -o test_model.gguf "https://huggingface.co/ggml-org/gpt-oss-20b-GGUF/resolve/main/gpt-oss-20b-mxfp4.gguf"This is a ~20B parameter model. Depending on your GPU VRAM, you might want to pick a smaller model. The process is the same regardless.
Step 4: Start the Server
llama-server is a lightweight, OpenAI-compatible web server included with llama.cpp. It hosts your model locally and gives you a chat interface in your browser.
# Start the server
# -ngl 99: Offload all layers to your AMD GPU (Crucial for performance)
# -c: Context Length
# -fa: Enable Flash Attention to reduce memory usage and increase speed
.\llama-server.exe -m test_model.gguf -c 2048 -ngl 99 -fa on --port 8080
Open your browser and go to http://localhost:8080. You'll see a clean chat interface where you can talk to the model.
The -ngl 99 flag is key — it tells llama.cpp to offload all model layers to your AMD GPU. Without it, you're running on CPU, which is painfully slow for anything beyond tiny models.
Step 5: (Optional) Run a Benchmark
Want to know how fast your GPU is actually running? Use the built-in benchmark tool:
# Run the benchmark with the downloaded model.
# -m: specifies the model file
.\llama-bench.exe -m .\test_model.gguf -fa 1
This will output two key metrics:
- PP (Prompt Processing) — how fast the model processes your input
- TG (Token Generation) — how fast it generates output tokens
These numbers are useful for comparing different models or tuning your -ngl and -c parameters.
Wrapping Up
Running local models isn't just a novelty — it's becoming practical. With AMD GPUs and pre-built llama.cpp binaries, you can have a fully local, OpenAI-compatible API running on your machine in under 10 minutes.
The model we used (GPT-OSS-20B) is just a starting point. The GGUF ecosystem has hundreds of models available on Hugging Face, from tiny 1B models to 70B+ beasts. Pick one that fits your VRAM and start experimenting.
I'll be writing more about practical AI engineering — building agents, running inference, and shipping AI-powered products. Follow along if that's your thing.